Download : How to set-up a Flex project in Flash Builder 4.5.mp4
How to Set-Up a Flex Project in Flash Builder 4.5 (Beginner Friendly Guide)


Introduction
If you want to develop Rich Internet Applications (RIA) using Adobe technologies, Flex is one of the most powerful frameworks. With Flash Builder 4.5, developers can easily create Flex applications using ActionScript and MXML.
In this step-by-step guide, you will learn how to set up a Flex project in Flash Builder 4.5, even if you are a beginner. By the end of this tutorial, you will have your first working Flex application ready to run.
What is Flex?
Flex is an open-source framework used for building interactive web and desktop applications using Adobe Flash Platform. It allows developers to create rich UI components such as:
Buttons
Forms
Data grids
Charts
Media applications
Flex applications are usually written using:
MXML – for UI design
ActionScript – for application logic
Requirements Before Creating a Flex Project
Before starting, make sure you have the following installed:
Flash Builder 4.5
Flex SDK
Java Runtime Environment (JRE)
A supported operating system (Windows / macOS)
Once everything is installed, you are ready to create your first Flex project.
Step-by-Step: How to Set-Up a Flex Project in Flash Builder 4.5
Step 1: Open Flash Builder
Launch Flash Builder 4.5 from your system.
When it opens, you will see the Flash Builder workspace, which includes:
Project Explorer
Editor Window
Console
Debug Panel
Step 2: Create a New Project
Follow these steps:
Click File
Select New
Click Flex Project
A New Flex Project wizard will open.
Step 3: Enter Project Details
In the wizard, enter the following information:
Project Name:
Example: MyFirstFlexApp
Application Type:
Web (runs in browser using Flash Player)
Desktop (Adobe AIR application)
For beginners, choose Web Application.
Step 4: Configure Flex SDK
Flash Builder will ask you to select a Flex SDK version.
Usually it auto-detects the SDK. If not:
Click Configure Flex SDKs
Select the installed Flex SDK
Click OK
Then press Next.
Step 5: Configure Output Folder
Flash Builder automatically creates the bin-debug folder, which contains compiled application files.
You can keep the default settings and click Finish.
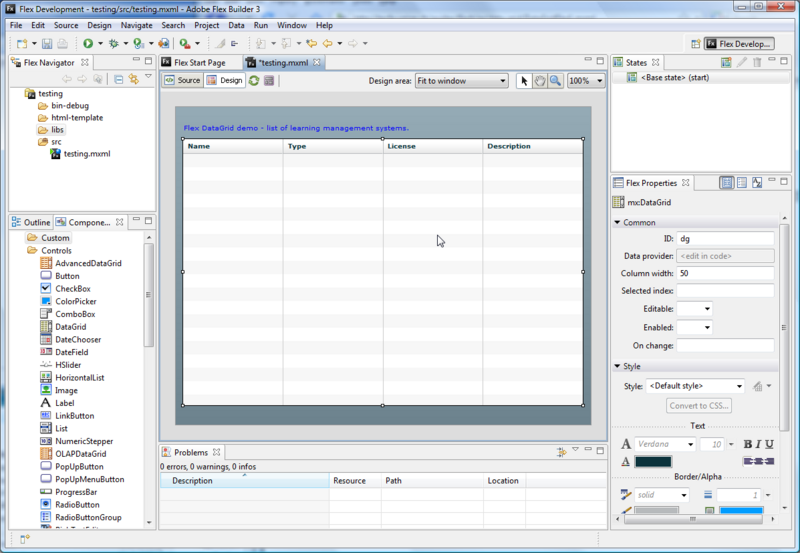
Understanding the Project Structure
After creating the project, Flash Builder will generate several folders.
Important Folders
src/
Contains your application source files.
bin-debug/
Contains compiled application files for testing.
libs/
Used for external libraries.
Main Application File (.mxml)
This is the main entry point of your Flex application.
Example:
MyFirstFlexApp.mxml
Example Flex Application Code
Here is a simple Flex application example:
<?xml version="1.0" encoding="utf-8"?>
<s:Application xmlns:fx="http://ns.adobe.com/mxml/2009"
               xmlns:s="library://ns.adobe.com/flex/spark"
               minWidth="955" minHeight="600">

    <s:Label text="Welcome to My First Flex Application!"
             horizontalCenter="0"
             verticalCenter="0"
             fontSize="22"/>

</s:Application>
What This Code Does
Creates a Flex application window
Displays a label in the center
Shows the message Welcome to My First Flex Application
Running the Flex Application
To run the project:
Click the Run button
Or press Ctrl + F11
Flash Builder will:
Compile the project
Launch it in a browser
Display the application using Adobe Flash Player
Common Issues and Solutions
Flex SDK Not Found
Solution:
Go to Preferences → Flash Builder → Installed Flex SDKs
Add the correct SDK path.
Application Not Running
Make sure:
Flash Player is installed
SDK path is configured correctly.
Advantages of Using Flash Builder for Flex Development
✔ Professional IDE
✔ Built-in debugging tools
✔ Code completion and syntax highlighting
✔ Easy UI development with MXML
✔ Integration with Adobe AIR
Conclusion
Setting up a Flex project in Flash Builder 4.5 is simple once you understand the basic workflow. By following the steps in this guide, you can quickly create and run your first Flex application.
From here, you can start exploring:
Flex UI Components
ActionScript programming
Data binding
Adobe AIR applications
Flex may be an older technology today, but it still remains an important part of the history of Rich Internet Application development.
This tutorial cover below topics.
Flash Builder 4.5 Flex project setup
how to create Flex project in Flash Builder
Flash Builder Flex tutorial
Flex SDK setup guide
beginner Flex development tutorial